How to Make a Slideshow in Windows 10 and 11
A presentation is one of the best ways to share a collection of photos engagingly. Knowing how to make a slideshow on Windows 10 and 11 is a bonus skill to bring panels to life with a creative touch.
With a variety of options, Windows consumers, especially those not tech-savvy, may face difficulty when choosing a reliable tool. To do it easier, we compiled a list of top 6 online and 4 desktop slideshow creators.
With the right slide makers and techniques, you can easily build beautiful and professional-looking sequences in no time.
Best slideshow software for Windows 11 and 10
After testing each program thoroughly, we compared our results and chose the best utility and the runners-up.
| Application | Customization options | Price | Output formats | Overall performance | Access |
|---|---|---|---|---|---|
| Icecream Slideshow Maker |
Add music, set transitions, change resolution, blur background, apply various video effects
|
Free, Pro from $19.95
|
WebM, MOV, AVI, MP4
|
5.0 | |
| Microsoft Clipchamp |
Incline music, text, transitions, change quality, utilize templates, employ various video effects
|
Free
|
MP4, GIF
|
4.5 | |
| Movie Maker |
Incorporate titles, music, transitions, rotate slides, record audio, adjust duration
|
Free with adds
|
MP4, WMV
|
4.5 | |
| File Explorer |
No
|
Free
|
No export
|
3.0 |

Selection process for slideshow creators for Windows 11 and 10
To pick the best ones for Windows, we had to carefully choose and test many programs and services.
We started by researching different free Windows slideshow makers and reading reviews from other users. Then, we opted for 10 that seemed promising and explored their functionality.
We paid close attention to features like:
- Formats supported;
- Customization options;
- User experience;
- The overall quality of the final product.
Based on that, below you will find two lists of photo slideshow makers - online and offline products - that are suitable to be used on Windows 10 and 11.
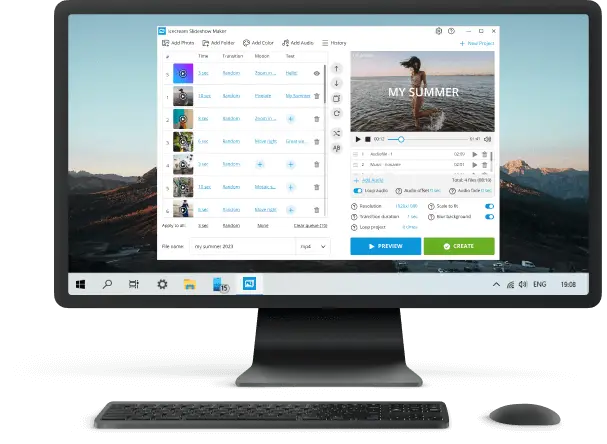
Method 1. Icecream Slideshow Maker
Icecream Slideshow Maker is definitely one of the best free options for Windows 11 and 10 available on the web. Consumers can create stunning video presentations of their vacation photos or create promotional albums for work.
How to make a slideshow on Windows 10 via Icecream Slideshow Maker
- Download slideshow maker for Windows and go through the setup. Launch the program to proceed.
- Click the "Add Photo" button to browse pictures one by one, or press "Add Folder" to load all images. With the drag-and-drop mechanism you can simplify the process. Set "Time" for each slide.
- Incline sounds to construct a playlist for the storyboard either by the "Add Audio" button or by simply dragging and dropping them. The footage can be reordered. You can loop the background audio ("Loop audio"), set offset ("Audio offset"), and fade ("Audio fade").
- Click "Preview" to check if the graphics and sounds are set as intended.
- Hit "Create". The bar will give you information on the status – the time remaining and elapsed.


The order of images can be changed: drag them or highlight a picture and utilize the UP/DOWN arrow buttons. You can apply the "Shuffle photos" button to randomize the order. Sorting files by their names is also available.
When the creation process is finished, the slideshow-making software will show a pop-up notification offering you the option to open the output folder. Now, you can upload the video to YouTube, Google Drive, or Dropbox; or even burn to CD or DVD.
Advantages
- This slide maker has a mechanism to set the duration time in seconds for each photo or all the pictures at once.
- The name and the output video format can both be changed.
- The chosen track for background music can be in MP3, M4A or WAV.
- Supports Windows 10 and 11, 8.1, and earlier versions.
- A wide range of customization tools: adjust font, color, position, and add animations.
- Slideshow creator is free of charge and has no watermark.
Method 2. Microsoft Clipchamp
Making a slideshow on Windows 10 or 11 with Clipchamp can be both enjoyable and fulfilling. It's easy to learn and offers some customization options. Moreover, this utility has the potential to turn a collection of ordinary photos into something extraordinary.
How to create a slideshow in Windows using Clipchamp
- Open Microsoft Clipchamp.
- Click the "Create a video" button.
- Select "Import Media". Add all the files for the photo slideshow to the timeline.
- Choose the needed settings and filters. When all changes are done, hit "Export".


Pros:
- You can set the duration, apply background music, put text on your slides, and utilize 3D effects.
- The result can be saved as a video file, so you can easily share it.
- Perfect for creating reel quickly.
Cons:
- Not suitable for complex edits or advanced techniques.
- Can't save images in custom formats or sizes.
- Doesn't offer support for third-party plugins.
Method 3. Movie Maker
Movie Maker is a video editing software developed by Microsoft. It was part of the Windows Essentials suite and provided users with an intuitive interface for redacting clips.
While the app was officially discontinued and is no longer supported by the company, you can still download it from Microsoft Store.
How to do a slideshow on Windows 10 using Movie Maker
- Install and open Movie Maker and click the "Create New Project" button.
- Hit "Add clip" to import pictures for your video slideshow. Press on each film to adjust the duration as needed.
- Go to the "Settings" tab and select "Transitions" under "Photo clips". Choose a style between your images to bring visual effects.
- Include background audio by going to the "Edit soundtrack" tab and clicking "Insert music". You can also record your own voice.
- Preview your work by clicking the play button and, once satisfied, export your photo slideshow using the "Save video" button.

Pros:
- It offers essential tools like trimming, splitting, and adding transitions, suitable for straightforward projects.
- The slideshow maker includes a variety of built-in effects and transitions to enhance the visual appeal.
- The program provides random transitions between pages, simplifying the process for users who prefer a quick and easy approach.
Cons:
- Microsoft officially discontinued Movie Maker in 2017, resulting in no updates or support for the application.
- Ads within the software, disrupting the process and detracting from the smooth experience.
Method 4. File Explorer
Did you know you could even make a slideshow on Windows OS without a program? File Explorer can turn a set of images into a video film. If you need to share your project immediately, building a sequence with this tool is a breeze and enjoyable.
How to create a slideshow on computer in File Explorer
- Launch File Explorer and go to the folder containing the photos you want.
- Select all the images you wish to include by clicking them while holding down the CTRL key.
- Click on picture utensils and choose "Start Slideshow" from the context menu that appears.
- A new window will appear with your project. Now, you can gather the family and present your photo slideshow to them.
- To finish displaying the narrative, tap "Exit".


Pros:
- You don't need any special tools or knowledge of coding.
Cons:
- No customization features or ability to make a slideshow with music.
- No timeline panel for creating complex animations.
- No ability to add captions or titles to slides.
- Cannot export projects as video.
Best online slideshow makers for Windows 11 or 10
Now that you've explored desktop applications, see the top 6 slideshow websites to create your next photo compilation.
| Platform | Customization options | Price | Output formats | Overall performance |
|---|---|---|---|---|
| Video Candy |
Add videos and photos, mute audio or incline custom background audio, blur bars, set transition effect, apply images duration, ratio
|
Free
|
MP4
|
5.0 |
| Google Slides |
Insert audio, video, tables, diagrams, and word art. Adjust layout, transitions, and background
|
Free
|
PDF, PPTX, JPEG, PNG, ODP
|
4.2 |
| Canva |
Use templates, incorporate elements, and text, change layouts, transitions, styles, and insert tables
|
Free, Pro $119.99/year
|
PDF, PPTX, MP4, PNG, JPEG
|
4.0 |
| Clideo |
Browse video, pictures, and GIF, insert audio, adjust orientation and slides duration
|
Free, Pro from $72/year
|
MP4, 3G2, 3GP, AVI, ASF, F4V, FLV, M2TS, M2V
|
3.5 |
| Animoto |
Use templates to create slideshows of your own photos and videos, and take advantage of the stock elements
|
Free, Pro from $8/month
|
MP4, shareable link
|
3.0 |
| Adobe Express |
Extensive customization options for layouts, fonts, and colors.
|
Free
|
MP4, link, social media
|
2.9 |
Option 1. Video Candy
Video Candy offers a whole set of online editing tools, including a slideshow maker. Its advantage is that both clips and images are supported, and the created presentation is saved in the popular MP4 format.
How to make a slideshow with music with Video Candy
- Open the slideshow creator in your browser (both PC and mobile).
- Drag and drop your materials into the tab if you're on a desktop. Or click the "Add file(s)" button to launch the file explorer on both mobile and PC.
- Rearrange the scenes on the timeline or load more items. Set the duration for the relevant pages (1 to 20 seconds), apply transitions for your video slideshow, and set the ratio. Bars (blurred, black, or no) will help you to customize the look of the media with a resolution different from the output one.
- Opt to mute the original audio and add your own to create a slideshow with music.


Pros:
- Free service for Windows 11, 10, and earlier.
- Intuitive interface, very easy to customize a presentation.
- Built-in preview player.
- Other handy tools to compress video files and to convert them, too.
Cons:
- Could offer more transition effects between the slides.
Option 2. Google Slides
One of the best and most accessible platforms is Google Slides. It is a fantastic opportunity to make a slideshow without the need for an extra program.
How to use Google Slides for creating a presentation
- Log in to your account and proceed to Google Slides to open the slideshow website.
- Choose the template you want to try for your sequence or press "Blank" to start from scratch.
- Include images, text, shapes, and other components.
- You can change the background, layout, and theme and choose transitions.
- Once you're done editing, click on the "File" menu at the top and select "Download" to save your display in any compatible format. In addition, you can share the reel, publish it on the Web, or send it by e-mail.


Pros:
- You can collaborate with other people while creating a slideshow.
- You can access the presentation from any device, including mobile devices.
- There are plenty of features available, including themes, transitions, and animations.
Cons:
- If you need more complex utensils, there may be better free slideshow maker options for you.
- There is no way to save all your slides as an image file, you have to do it one at a time.
- The collaboration can be unreliable at times.
- The platform can be slow or laggy when dealing with large storyboards or multiple users redacting at once.
- Not all features are available on mobile devices, so you may not be able to access all of the tools you need while on the go.
Option 3. Canva
Canva is a powerful slideshow website for creating high-quality presentations and films out of photos. With its easy interface, you can create professional-looking narrative in no time. Moreover, it offers stock elements and templates for various occasions.
How to use free online slideshow maker on Canva website
- Sign up for an account with Canva if you don't already have one.
- Choose the "Presentation" option from the main menu.
- Select a template from the library of templates or start with a blank canvas. Import photos and audio for your video with the "Upload" option on the left-side panel.
- Start creating a slideshow by adding text, images, shapes, and other elements
- Adjust the fonts, colors, and design elements to create an eye-catching presentation.
- Publish your finished compilation directly from the service or export it as an image or build a PDF.
- Share your reel with friends and colleagues via email or social media sites like Facebook and Twitter.


Pros:
- Has a friendly interface that facilitates the quick processing.
- There are hundreds of professionally designed templates, for example, for making a wedding slideshow.
- Supports a variety of file types, including JPG, PNG, and PDF, so users can export their works to any platform they wish.
Cons:
- Some templates and stock images are only available with the Pro account.
- Doesn't have a customer support team or online forum for help with technical issues.
Option 4. Clideo
Clideo is a multi-purpose website that offers several web-based tools, including the online slideshow maker. The simple interface will help you quickly generate a video out of your photos to share with family, and friends, or even apply it for business purposes.
How to use video slideshow maker on Clideo website
- Go to the website. Start uploading your footage with the "Choose files" button or incline them directly from your Google Drive, Google Photos, or Dropbox.
- In the new window, begin customizing your narrative. You change the "Crop options", "Image duration", "Add audio" or more clips.
- Under the timeline, you will see the output file's duration and resolution. You can also change the resulting format.
- When you are done editing, hit "Export" and wait for the processing to finish.
- Now, you can pull out your video, or upload it directly to your cloud storage.


Pros:
- The web-based tool deletes all the input items right after making a slideshow.
- Various types can be added - images, videos, GIFs, and audio for the background sound.
- In the free version, each upload can be up to 500 MB.
- The slideshow creator is compatible with all the popular formats like JPEG, TIFF, PNG, MP4, AVI, DVD, GIF, MP3, etc.
Cons:
- Limited customization options and no transitions are available.
- If you wish to create a slideshow for free, there will be a watermark on your final output.
- The free accounts only allow store projects for 14 days, after which they are deleted.
Option 5. Animoto
Animoto is a well-known online platform that allows users to easily create professional-looking content. It provides a range of templates, music tracks, and customization options.
The service is popular among individuals, businesses, and educators for creating marketing clips, social media content, presentations, educational videos, and more.
How to make a picture slideshow using Animoto
- Visit the website. Create an account or log into an existing one.
- On the "Create" page, select the "Animoto memories" option.
- From the provided categories, choose the "Style" for your slideshow: kids, wedding, party, travel, and others are available. Once you pick one, hit the "Create video" button.
- Click "Add pics & vids" to import the images fro your slideshow. Move the clips around to place them in the desired order. Press the gear icon to add a caption.
- You can click "Change song" and choose music from the library that is suggested for the style you've selected. To incorporate a particular song, press "Upload song" and import it from your computer.
- Hit the gear icon in the top right corner under the "Upgrade now" button to edit the song's duration and pace, and set the image pacing.
- In the same location, find "Settings" to open and enter the video title, producer, and description. You can also choose the thumbnail.
- Click "Preview video" to ensure that the slideshow looks the way you want it to.
- Proceed with "Produce" to export the slideshow. Here you will be able to pick the desired resolution.
- Now you can either "Download" the video or "Share" right from the website.


Pros:
- The interface is simple and intuitive, making it accessible to individuals with varying levels of technical expertise.
- Users can upload their own images, videos, and music or choose from the extensive library of assets.
- The slideshow maker provides a wide range of customizable templates in various themes and styles, catering to different purposes and preferences.
Cons:
- While there is a free plan, it comes with limitations on duration, quality, and access to premium features.
- Slideshows created using the free plan will have a watermark. Removing it requires upgrading to a paid plan.
Method 6. Adobe Express
Adobe Express is a versatile, user-friendly online platform for composing visually appealing content, including slideshows. It offers an intuitive interface, making it accessible for beginners and efficient for gurus.
How to create a slideshow using Adobe Express
- Go to the website and sign in with your Adobe account. If you don't have one, you can make a free profile or employ social media login options.
- Click the "Create now" button to start a new project.
- Upload your photos and videos in the "Media" tab.
- Drag and drop your images to the timeline and arrange them in the desired order. Hit "Add scene" to create a new slide.
- Insert text, icons, and other elements. You can adjust the layout, style, and timing to suit your needs.
- In the "Media" tab you can add background music from Adobe's library or upload your own track.
- Use the preview button to see how your slideshow looks and make any necessary tweaks.
- Once satisfied, save the results. You can download it as an MP4 file, share it via a link, or directly post it to social media platforms.


Pros:
- A wide variety of templates helps get started quickly.
- Access to a large collection of free photos, icons, music, fonts, and more.
- Direct sharing options for various social media platforms.
Cons:
- Some might find the customization options too basic for complex initiatives.
PC vs online slideshow makers
When it comes to creating engaging presentations or sharing memories through storyboard, there are two primary options: web-based and desktop utilities. Each has its own set of advantages and considerations, making the choice between them crucial for achieving your desired outcome.
| Pros of desktop slideshow software | Pros of online slideshow creators |
|---|---|
| Work without an internet connection. | Accessibility from any device with internet access. |
| Greater control over data security and privacy. | Real-time collaboration capabilities. |
| Robust features, parameters, and options. | Easy sharing across various platforms. |
| Local storage on the device. | Wide range of templates and multimedia options. |
| More advanced features for experienced gurus. | Cloud storage for seamless organization and accessibility. |
Ultimately, the choice between online and desktop slideshow makers depends on your specific needs, preferences, and workflow.
Whether you prioritize accessibility, collaboration, data security, or advanced customization, carefully evaluating the features and considerations of each type of software will help you select the right tool to bring your ideas to life.
FAQ
- What type of files can I use in Windows slideshow maker?
- You can use JPG, PNG, BMP, GIF, and TIFF for your presentation on Windows 10.
- How can I incorporate music into my slideshow?
- To add background sound to your video, ensure you pick a slideshow taker with a music-implementing feature. Not all software comes with such ability.
- How to change the duration of each slide?
- Usually, a slideshow maker will allow you to adjust the slides' duration either by using one of its instruments on the toolbar or by customizing the settings of each slide individually.
- How can I adjust the transition between slides?
- Some slideshow websites and programs offer to pick a transition from the library, while others have a standard slide switch that is automatically applied.
- Can I preview my slideshow before saving or sharing it?
- Usually, you can preview your slideshow by clicking the "Play" button (or something similar) under the preview window.
- How do I change the sequence of the slides?
- Rearrange slides by dragging them into place in the preview pane or using the reorder option.
- What is the maximum number of slides allowed?
- The limit may depend on the specific software, but generally, you can include hundreds of slides.
Tips
Learning how to make a slideshow on Windows 10 or 11 is not a complicated task. With a little practice, you will be able to create memorable slideshows.
Some more helpful tips for you as you build your presentation:
- Plan ahead. In advance of building a video slideshow on Windows 10 and 11, decide on the type of presentation you desire to create. Confirm you have all the necessary visuals and information.
- Gather your materials. Gather all the items to be included in the slideshow such as images, videos, text, etc.
- Start building. Create a new project in your chosen app and begin adding your stuff to it - images, text, graphics, etc.
- Organize the slides. Arrange the slides in a logical order and use transitions between each one to make them look professional and attractive.
- Insert audio/video. If you want to add audio or video clips, take appropriate video formats and ensure they are optimized for web playback.
- Search for mistakes. Before submitting the slideshow, double-check photo slides for any typos or other errors that could distract your viewers.
- Keep it brief. Remember that less is more - try to keep your demonstration concise by focusing on key points and avoiding unnecessary details.
- Choose an appropriate background. Select a background that will complement the content. Plain backgrounds work best as they remain in focus.
- Practice. Verify you practice presenting previous to delivering the slideshow in front of an audience. This will help ensure that everything goes smoothly during the presentation!
Conclusion
Utilizing a free slideshow maker for Windows 10 and 11 can help you master presentation-building skills. In this article, we described 10 best options. Some of them are best for simple tasks, while others offer advanced customization features.
We hope that now you can pick a slideshow software or service you feel confident in using. Go ahead and enter the creative world of slideshow-making!

Chefredakteur bei Icecream Apps
