Schedule Your Screen Capture With Ease
Knowing how to schedule screen recording can be an invaluable skill for anyone who wants to capture ongoing activities on their computer.
Whether you need to track the progress of a project, record a tutorial, or create a presentation, having the understanding of how to set up recordings in advance can save time and streamline your workflow.
In this article, we are going to show you how you can automate your screen recording tasks in 4 simple and easy ways.
What does schedule recording mean?
Recording schedule is a feature that allows you to plan and capture your screen without being in front of the PC. It's commonly used by streamers, gamers, and video creators who want to screen record without needing to begin or finish the recording manually.
You can customize your schedule recording settings to fit your needs. Most desktop recorders let you choose the duration of the recording, where it will be saved, and more. This facilitates a speedy setup of your recordings before beginning a stream or game session.
Scheduling recordings is an effective way to stay organized during the content creation process. It's also convenient for those who stream or play games regularly and need an efficient way to manage their recordings.

Selection criteria of screen recorder with timer
We recently tested several popular recording screen services that offer timed capture. Our team considered a few key factors when evaluating these tools.
- First and foremost, we considered the flexibility of scheduling options, such as the feature to set up recurring recordings.
- Additionally, we evaluated the reliability of these tools. We tested each screen recorder's capacity to handle long recordings without crashing or experiencing technical difficulties.
- Finally, we took into account the ease of use and the presence of necessary tools and software.
Based on our testing, we recommend 4 applications for scheduling screen recordings. These tools offer reliable performance, flexible scheduling options, and high-quality recordings that meet the needs of the average user.
Method 1. Icecream Screen Recorder
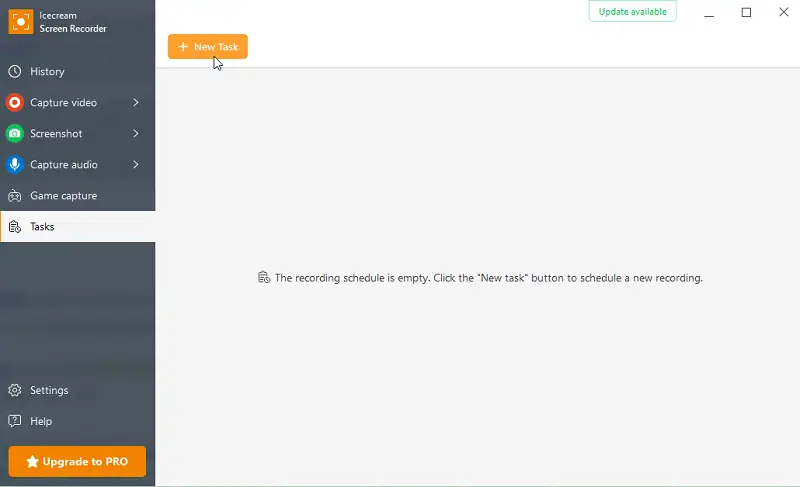
Sometimes you might need to record something on your PC while you know that you won't be near the computer. Icecream Screen Recorder offers the opportunity to schedule the recording of a certain area that will begin and finish at the needed time.
Check out the guide below to find out more on how to do that:
- Download free screen recorder for PC. Execute the setup process. When everything's set, open the program.
- Open the "Tasks" panel.
- Click the orange "+New task" to start scheduling the recording.
- Select the area to be recorded.
- Enter the date and time when you want to start and automatically stop the recording. Enter a custom title for the scheduled task if needed (if the name wasn't entered, it will be named "Task #1").
- Before the scheduled screen recording starts you may click the pencil button to edit the task or the recycle bin icon to permanently delete the created line.
- When the finishing time of the task comes, the program will automatically create the video file and save it into the destination folder.
You can find all the tasks to be recorded, tasks in progress, and completed tasks shown in the "Tasks" panel in the table view.
Before you set the recording timer, please make sure you have sufficient free disk space to record the task successfully. To record 1-hour long video you will approximately need 1 GB.

Pros:
- Full-featured screen recorder for Windows.
- Easy-to-use interface with modern design and color schemes.
- Integrated video editor with the ability to watermark videos.
- Free cloud storage for uploading videos.
- Customizable settings such as recording quality, resolution, video format, etc.
- Possibility to capture the webcam together with the screen.
Method 2. Bandicam
The screen recording software was first released in 2006 and has since gone through multiple updates.
If you aim to save your computer desktop but don't have the time to stay put all day, scheduling a screen capture is a great way to go. With Bandicam users can set up a recording schedule for specific times and days of the week when they would like to save their screens.
Here's how you can schedule the recording:
- Download and install the program.
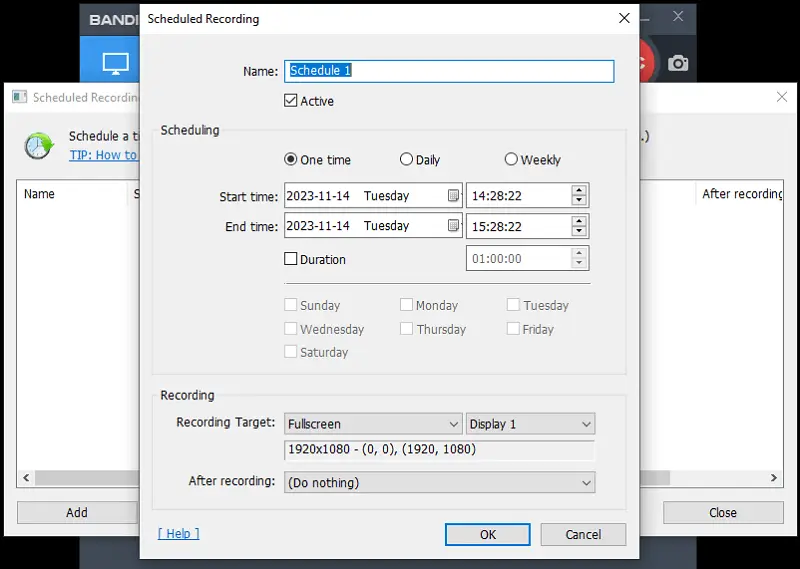
- Open the program and go to the "Scheduled Recording" tab.
- Click the "Add" button. Set up the recording time, duration, target, and what the application should do upon completion.
- Tap "OK" to save your settings to record your desktop.
- When the time comes, you'll get a notification that your recording has started.

Pros:
- Multiple export options.
- Flexible FPS settings for 4K Ultra HD video capture.
- Intuitive user interface that makes scheduling recording quick and easy.
- Choice of preset time and date options.
Cons:
- Video recorder works only on Windows PC.
- Users can only record up to 10 minutes for free.
- Videos made with the free version would be watermarked.
To ensure smooth playback of your recordings, Bandicam can record 120 frames per second.
All in all, this is an ideal selection for anyone in need of an uncomplicated screen recording solution that comes with scheduling features. Its intuitive interface and advanced encoding technology make it an ideal choice for both beginners and experienced users alike.
Method 3. FlashBack Recorder
This is an effective and multifaceted screen recorder with a timer. It has an easy-to-use interface and allows you to create high-quality recordings of your computer screen. It also features a powerful scheduler that lets you automate your screen capture tasks.
Blueberry Software released the first version of BB FlashBack in the summer of 2003.
Here's how to get started:
- Download the software to record your screen and install it.
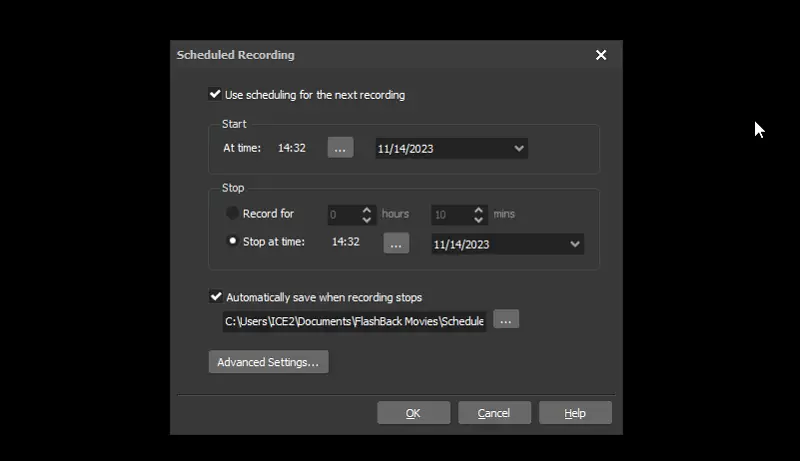
- Launch the screen recording software and click "Set Timer".
- Check "Use scheduling for the next recording" to unlock the settings window.
- Select the start date and time for your recording, then how often the capturing should repeat (if applicable), and if you want to automatically save the video.
- When you're finished, click "OK" to save your scheduled recording settings.

Pros:
- No time limit and no watermarks.
- Displays mouse motion highlight.
- External audio narration can be added.
Cons:
- The free trial period is limited to 30 days.
- An outdated platform that may appear slow to use.
- Maximum video recording resolution is 720p.
- Created only for Windows users.
By default, FlashBack files have an FBR file extension. It is a multimedia container format containing a recorded screen and separate audio tracks.
Making use of this program to schedule video recordings is effortless, quick, and effective – perfect for capturing important or recurring events on-screen without the hassle of having to start and stop the process manually each time!
Method 4. Debut Video Capture
Debut is a potent screen recording software that lets users to extract video from their computer's screen. It allows you to schedule recordings, adjust frame rate and compression quality, and much more.
DVC is a video recording and screencast program from NCH Software, available for both Windows and Mac.
Follow these steps to plan your recording schedule:
- Get the app onto your PC.
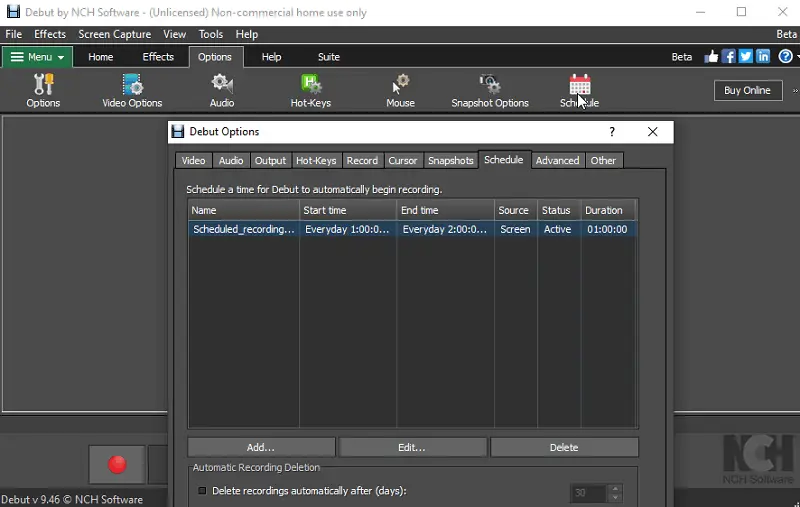
- Open the app and press the "Options" tab. Press "Schedule".
- Set the date, start time, duration, and source as needed.
- Click "Add" to store your scheduled recording session.
- When ready, tap "OK" to begin screen recording according to the schedule you set up earlier.

Pros:
- Captures your screen to over 60 different file types.
- Offers good video and audio quality.
Cons:
- Complicated user interface.
- The free version of video recorder includes watermarking of the exported videos.
- The program can take up a lot of RAM and processing power when recording.
- There are no hotkeys to manipulate the recording.
Overall, the platform is a great option for users who need a program with a recording timer and good-quality output. However, its cost and limited features may be an issue for some users.
Precautions to take when scheduling the recording
When scheduling a screen recording, there are several steps you should take:
- Make sure your computer is turned on and awake. If the computer is in sleep or hibernate mode when the scheduled recording is set to begin, it will not start as expected.
- Check your storage capacity. Ensure that you have enough space on your hard drive to store the video file. If you don't have sufficient capacity, the recording may fail or your computer might slow down significantly.
- Be aware of how much time the recording will take. If it's too long, it may take up too much of your system's resources and cause performance issues.
- Verify that no other unnecessary programs or applications are running while the recording is taking place. Doing so could interfere with the quality of the recording and cause it to stop prematurely.
By following these simple precautions, you can rest assured that your recording schedule will go off without a hitch!
FAQ
- Can I modify my recorded videos?
- Many apps allow you to edit the videos for free on PC after recording them, and have different features such as trimming, adding text/graphics, and adjusting the playback speed.
- What is the best resolution for capturing my screen?
- It depends on what type of content you are recording - for viewing on a mobile phone 720p is usually sufficient. If it's for TV viewing then 1080p is recommended. For high-definition displays then 2K or 4K resolutions are recommended.
- How do I schedule recording for only part of the screen?
- Most programs allow you to select a specific area of your desktop to record instead of capturing your entire display. Simply drag and resize the selection box to choose which area you want to capture before beginning your recording.
- Is there a time limit for each recording session?
- The maximum length of a video depends on the software you're using and your computer's capabilities, but most programs allow for recordings up to several hours if needed.
- Does scheduling screen recordings impact system performance?
- It consumes system resources during the recording period, potentially affecting performance, especially if you have a weaker computer. It's advisable to schedule recordings during times of low activity.
- Can I schedule screen recordings for multiple displays?
- Yes, if your screen recorder supports it, you can select multiple displays or specific monitors.
The first screen capture software was created in the early 1990s. It was called Lotus ScreenCam and was primarily used for software demonstrations.
Tips
- Determine your recording goal. Decide what you want to capture, how you will use the recording, and the format you need it in.
- Consider the size of the window or area to be recorded. Make sure it's not too small or large.
- Experiment with multiple screen recording tools until you discover the one that meets your requirements.
- Leave time to review and edit your recordings. You may need to trim down parts of the video, add captions, or adjust sound levels.
- Make sure your device battery is fully charged or plugged in while recording or the session could be interrupted mid-way through.
- Adjust your screen's brightness to conserve energy during the recording session.
- Disable notifications on your device while recording so they won't distract you or appear on the video feed.
- Back up all of your data in a secure location, such as an external hard drive or cloud storage service like Dropbox or Google. This will guarantee that your recordings are safe in case of any hardware or software issues.
Summary
In conclusion, scheduling screen recordings can be a useful feature for those who need to capture specific events or activities on their computer screen.
Ultimately, the best choice will depend on your specific needs and budget. We recommend taking the time to evaluate each option carefully to determine the best fit for your requirements.
With the right screen recorder with timer, you can easily schedule recordings and capture high-quality output for a variety of purposes.


