How to Screenshot a Part of the Screen on Windows and Mac
Screenshots allow users to get a picture of what is currently on their screen for reference purposes or for sharing with others. Learn how to take a screenshot of a selected area to capture screenshot with precision.
Whether you need to highlight specific details or crop an image, this article will walk you through the simple steps to take a partial screenshot. Get ready to elevate your screen-capturing with accuracy and efficiency.

How we picked tools to screenshot a part of the screen
When choosing software to make a selective screenshot, we considered several key criteria to ensure efficiency:
- Ease of use. We favored tools with intuitive interface that are accessible to both beginners and experienced users.
- Compatibility. We included options for various operating systems, including Windows and macOS.
- Editing capabilities. We looked for tools that offer basic editing features, such as cropping, annotating, and adding text to photo screenshots, enhancing their usability.
Icecream Screen Recorder
With Icecream Screen Recorder, it is convenient and swift to capture a screenshot of part of the screen.
Guide for taking a screenshot using Icecream Screen Recorder:
- Download free screenshot software and install it on your computer.
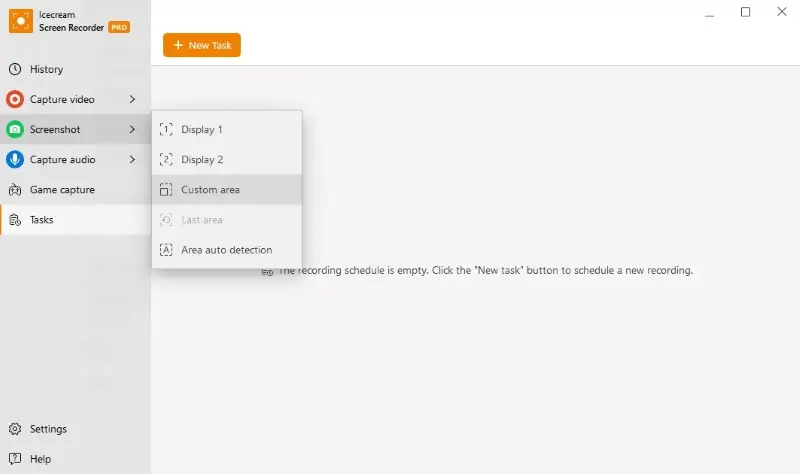
- Click "Screenshot" in the side menu and press "Custom area".
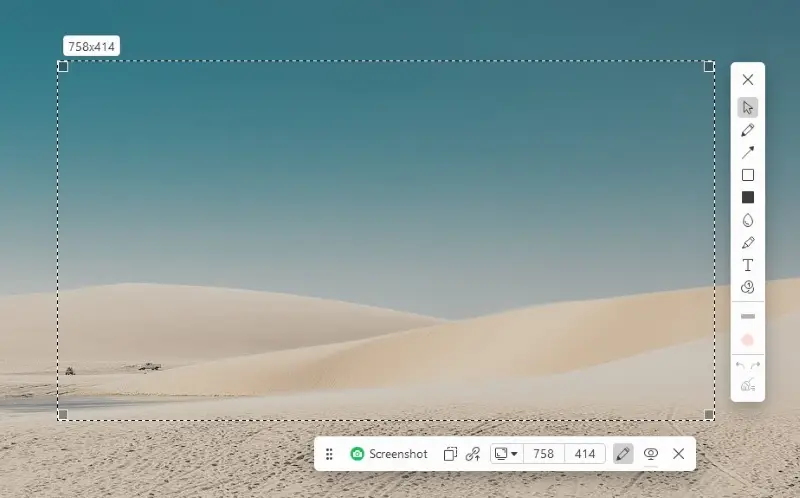
- Select the desired part of your screen by moving the cursor and toggling over the area. Once you've chosen the section, release the mouse.
- You can use the "Drawing panel" to add text, steps, arrows, and other elements.
- Click "Copy" to place your screenshot on the clipboard, "Screenshot" to edit, crop, and save the image, or "Upload" to create a shareable link.
Pros:
- The free screen recorder is free and easy to use, so anyone can easily take a partial screenshot with it.
- It has powerful screenshot editing tools that allow you to quickly add annotations or highlights before and after taking a screenshot.
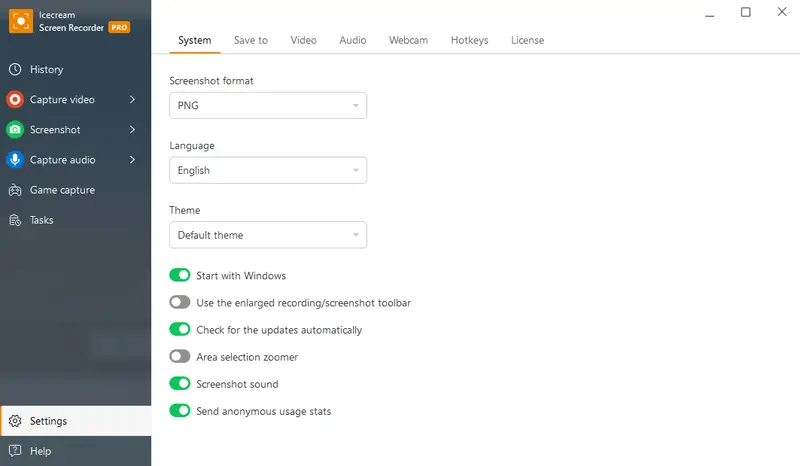
- The program supports popular image formats like JPG and PNG, so you can easily share your screenshots with others.
- The app offers various screenshot modes, such as full screen, custom area, and selected windows, letting you capture what you need.
- The application can also record screen parts, which can be useful for creating tutorials or presentations.
- You can use hotkeys for capturing screenshots and screen recording, enhancing efficiency.
- It features a drawing panel, allowing you to write, highlight, or draw attention to specific areas in real time.
Using Icecream Screen Recorder is a great way to quickly screenshot part of your screen without using complex software. Utilizing this program, anyone can get images of their chosen area in a few simple steps!
Game Bar
Game Bar is a built-in Windows feature designed primarily for gamers, but it's also a convenient tool for capturing screenshots and recordings of any application.
How to make a screenshot of a part of the screen in Game Bar:
- Open the window or app you want to preserve.
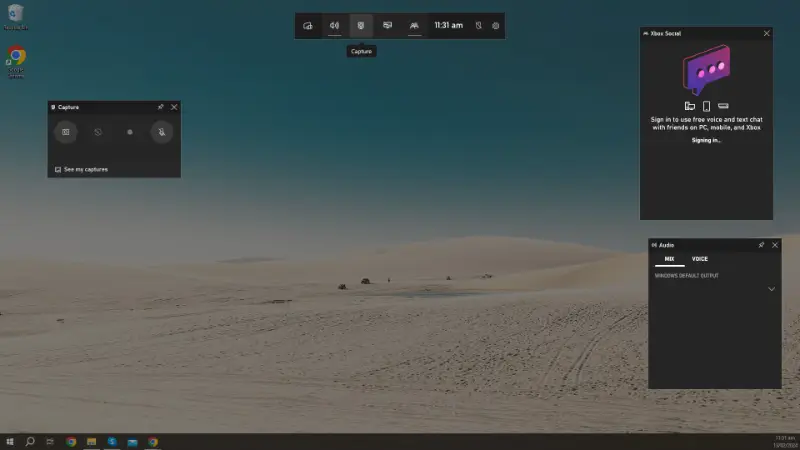
- Press Win + G on your keyboard to launch the overlay.
- Look for the "Capture" widget (you may need to enable it from the menu).
- Click on the camera icon to take a screenshot of the current window.
- The image will be saved automatically to your Videos > Captures folder.
Pros:
- Pre-installed on Windows 10 and 11—no need to get extra software.
- Ideal for taking quick screenshots of full windows or games without leaving the app.
Cons:
- May not launch correctly if background Xbox services are disabled.
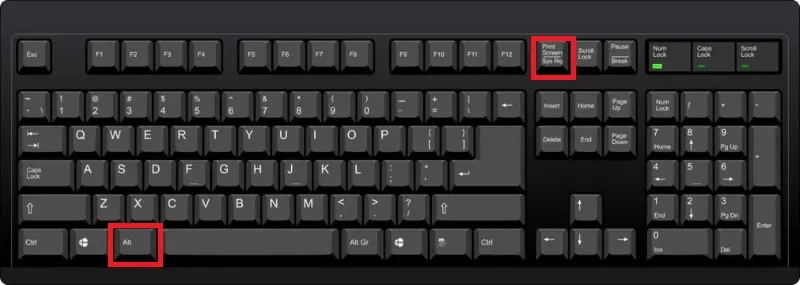
Alt + Print Screen
Taking screenshots on Windows is straightforward with hotkeys. This combination will capture the active window.
How to take a screenshot of a selected area
- Press Alt and Print Screen simultaneously.
- The screenshot will be saved to the clipboard.
- To save it, open any photo editor and paste the image by pressing Ctrl and V.
- Save the screenshot as a PNG or JPG image.
Pros:
- Captures the window quickly without the need for additional software or tools.
- The screenshot is copied to the clipboard, so you can paste it into documents or messages.
- Ideal for quick sharing in chats, emails, or documents without saving the file first.
Cons:
- Can't take a screenshot of specific regions, limiting its versatility.
- If you forget to save the image manually, it will be lost when you capture the next one.
Windows + Shift + S
This way you can select a custom area for a partial screenshot on Windows.
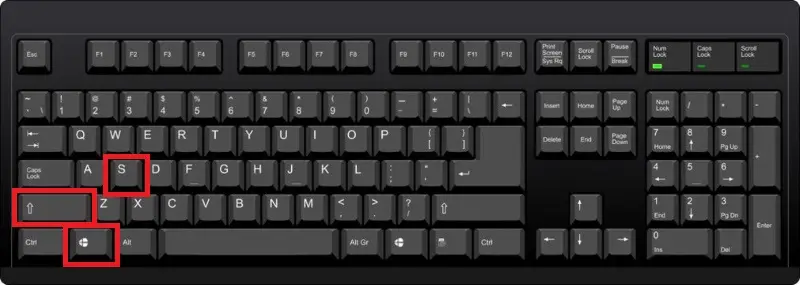
- Press the Windows Key + Shift + S at the same time.
- Your screen will dim and your mouse cursor will turn into a crosshair.
- Use the crosshair to select the area of your screen that you want to capture.
- You will see a pop-up window. Click it to open your screenshot in Snip & Sketch.
- You can copy it to the clipboard or save it in any folder on your PC.
You can choose how to take a screenshot before selecting the area.
- Rectangular. This mode enables you to screenshot a rectangular area on your screen. You can precisely size and position the rectangle.
- Free-form. Draw a custom, freehand shape on your desktop to define the area for screen capture.
- Window. Capture a single program, browser window, or application without including the surrounding elements.
- Full-screen. Make a screenshot of your entire screen to encompass every element currently displayed on your monitor.
Pros:
- Provides basic annotation and sketching tools, allowing you to add notes or highlights.
- Works seamlessly with touchscreen and stylus devices, ideal for tablets or 2-in-1 laptops.
Cons:
- This shortcut is only available in Windows 10 and 11.
Snipping tool
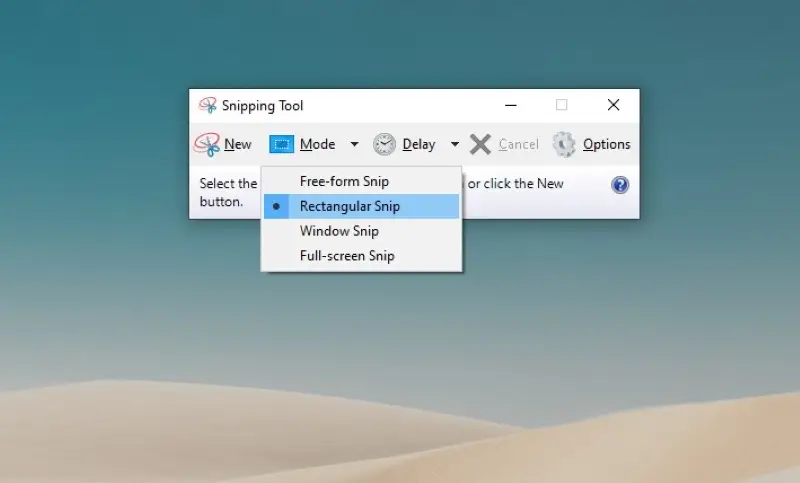
You can screenshot a part of your screen using a built-in Windows program.
How to take a partial screenshot in Snipping tool
- You can find this app in the "Start" menu or by typing "Snipping tool" in the search bar.
- Press the down arrow on the "Mode" button and select the "Rectangular Snip" option.
- Click and drag your mouse to choose the area for a selective screenshot.
- If you want, you can edit the image by highlighting, writing, or drawing on it.
- When you are ready, click "File" and then "Save as" to get your screenshot in your desired location and format (JPG, GIF, etc.).
Pros:
- You can capture a screenshot in different modes, including free-form, rectangular, window, and full-screen.
- Lightweight and doesn't consume much system memory, making it suitable for older devices.
Cons:
- Is considered outdated and has been replaced by more modern alternatives in recent Windows versions.
Greenshot
Greenshot is an open-source software for Windows. It allows users to capture screenshots of their desktop or specific regions, annotate them, and save or share the images.
How to use Greenshot to make a partial screenshot on Windows
- Download and install Greenshot on your computer.
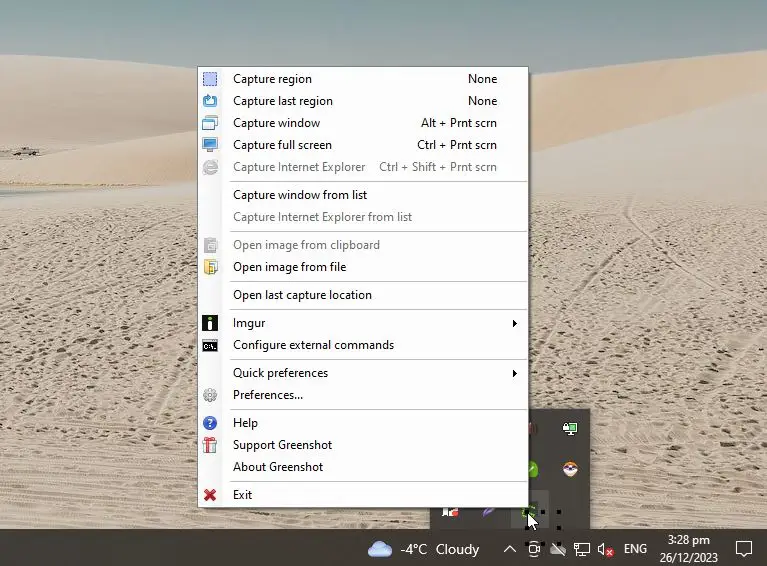
- After installation, the program runs in the background. You can access it by clicking on the icon in the system tray.
- Select one of the capture methods:
- Region. Allows you to choose a custom area for capture.
- Last region. Repeats the last selection.
- Window. Captures a specific window or application.
- Full screen. Takes a picture of the entire screen.
- Once you've taken a screenshot, the program offers to open a built-in free image editor.
- After capturing and annotating the picture, you can save it to your computer, copy it to the clipboard, or send it to a printer.
Pros:
- The source code is available for anyone to inspect and modify.
- Includes a built-in editor that allows users to annotate and edit screenshots.
- Doesn't consume significant system resources.
- Enables capturing of scrolling web pages.
Cons:
- There is a MacOS version available, but you need to pay for it.
Lightshot
Lightshot is an easy-to-use screenshot tool available for Windows and macOS. It lets users capture screenshots of their desktop, specific windows, or selected areas of the display.
How to make a screenshot of a part of the screen in Lightshot
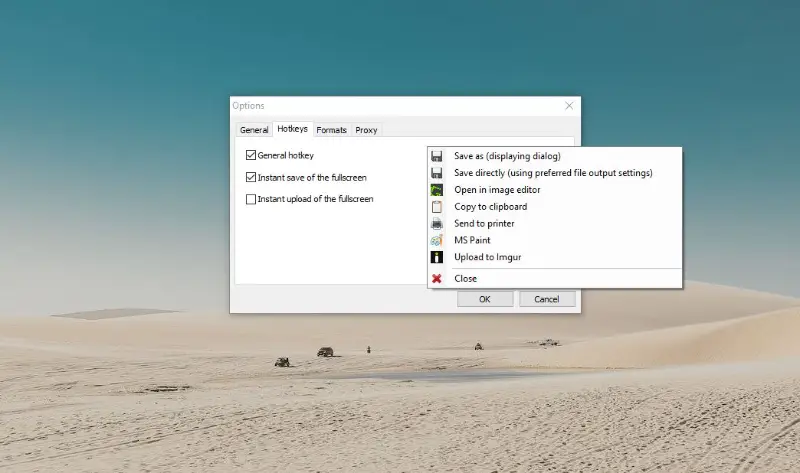
- Begin by downloading Lightshot from its official website.
- Once installed, launch the app using the keyboard shortcut (default: Print Screen on Windows, Command + Shift + 9 on macOS).
- Your desktop will be overlaid with a semi-transparent layer. Use your cursor to choose the part of the screen you wish to capture.
- Use the toolbar that appears after selecting an area to access various annotation features.
- Once you are satisfied with the result, you can export the screenshot by clicking the "Save" button or copy it to the clipboard.
Pros:
- You can customize your picture with annotations to convey information more effectively.
- The free screenshot tool is designed to be lightweight and fast, ensuring that you can capture images without any lag.
Cons:
- Does not offer the ability to schedule automatic captures at specific times or intervals.
Programming option
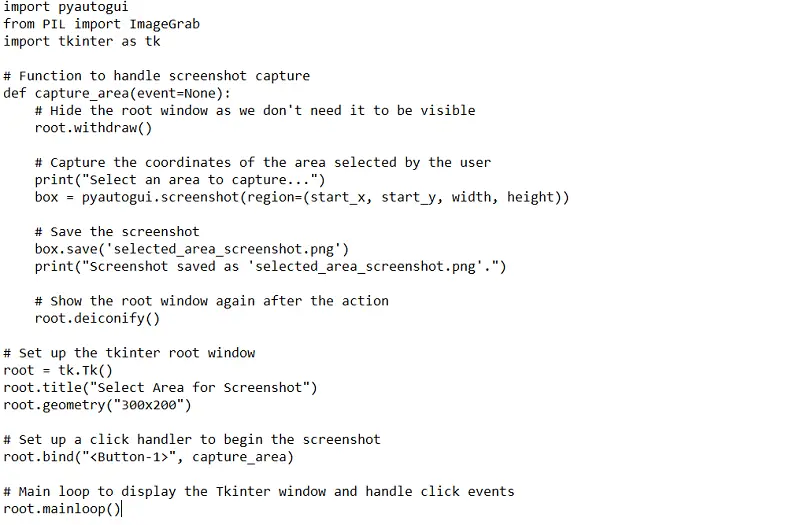
You can use Python along with libraries like Pillow (for image processing) and PyAutoGUI (for screen capture).
How to screenshot a selected area using Python
- You need to install dependencies first, if you haven't already.
- Write code to take a screenshot of a selected area.
Pros:
- Both PyAutoGUI and Pillow work on Windows, macOS, and Linux.
- The library supports saving images in various formats (e.g., PNG, JPG, BMP).
Cons:
- The region selection in the current implementation is hard-coded and not dynamic.
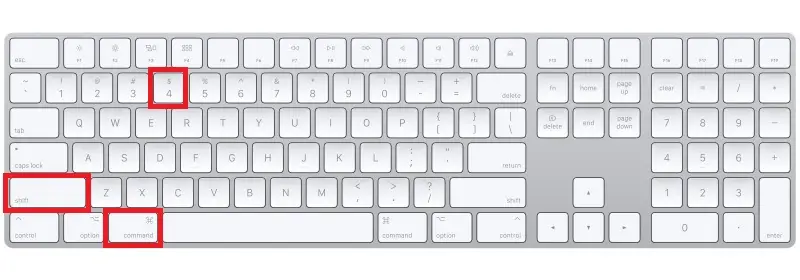
Command + Shift + 4 on MacOS
Taking screenshots on MacOS is simple and easy with the hotkey combination.
How to take a screenshot of a selected area with hotkeys on Mac
- Press Command + Shift + 4 simultaneously on your keyboard.
- The cursor will change to a crosshair. Click and drag it to screenshot a part of the screen.
- When the desired area is selected, release the mouse button or trackpad.
- The image will be captured and saved as a PNG file to your desktop.
It is also possible to make a screenshot of a specific window:
- Press Command + Shift + 4.
- Press and release the space bar.
- Click on the desired window you want to take a screenshot of.
You can also copy the screenshot directly to your clipboard instead of saving it by pressing "Control" while dragging the selection area. This way, you can paste the image into any document or presentation without having to save it first.
Press and hold the space bar before releasing the mouse button. This will lock the shape but let you reposition it on the screen. That way you can adjust the initial selection if it's a little off.
Once you've captured your screenshot, you can use Preview or photo editing software to make any necessary adjustments before saving or sharing it with others.
Pros:
- Simple and intuitive way to take screenshots of an area quickly and without any new app.
Cons:
- Generic capabilities without customization options.
iScreen Shooter
Apart from the native utility, you can get a more sophisticated software. For example, iScreen Shoter.
How to take a partial screenshot with iScreen Shooter app
- Go to the App Store and download the program to your computer.
- Once installed, open it. The software will run in the background.
- A new icon will appear in your Mac menu bar. Click it and pick "Screenshot".
- Now, hover over the desired content. Press the left mouse button and drag it to cover all the area you need to capture.
- Release the mouse to begin annotating your screenshot. You can add text, lines, images, etc. When finished, press "OK".
If you don't want to save the picture but rather copy it and paste right into a specific document, before releasing the mouse, press C on your keyboard.
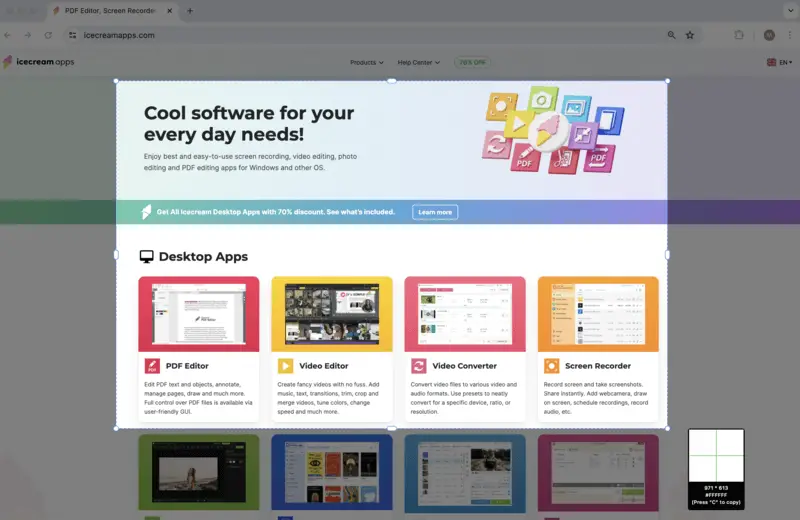
Unlike the built-in screenshot functionality, this program allows for immediate customization of your content without saving it first. In addition, the app has OCR capabilities which may be helpful for saving text from images posted online or included within a document.
Pros:
- Free screenshot maker for macOS with advanced capabilities.
- Also offers a free screen recorder within the same app.
Cons:
- Requires some time getting used to the interface and learning about all the offered tools.
Best formats for screenshots: table
| Format | Best for | Pros | Cons |
|---|---|---|---|
| PNG | High-quality images with transparency. | Lossless compression, supports transparency. | Larger file size, not ideal for very complex images. |
| JPEG | Photographs or images with complex color gradients. | Small file size, good compression for photos. | Lossy compression, no transparency support. |
| GIF | Simple graphics with animation or low-color images. | Supports animation, small file size for simple images. | Limited to 256 colors, no alpha transparency in static images. |
| WEBP | Web content, images requiring both quality and small file size. | Excellent compression, supports both transparency and animation. | Not universally supported in all browsers or apps. |
| TIFF | High-quality images for print or professional use. | Lossless, excellent quality, supports multiple layers. | Very large file size, not ideal for web use. |
| BMP | Raw, uncompressed images. | Simple format, no compression. | Very large file size, not optimized for web or modern uses. |
| HEIF/HEIC | Efficient image storage, high-quality photos. | High compression, retains quality, supports transparency. | Limited software support, not as widely compatible. |
FAQ
- What file format should I use for screenshots?
- Most image editing programs support JPEG, PNG, or TIFF formatted files for screenshots.
- Is there a way to capture multiple screenshots simultaneously?
- Yes, you can use software such as Icecream Screen Recorder to take multiple screenshots without losing the previous ones.
- How can I capture an image of my whole screen?
- On Windows, press the PrtScn key on your keyboard. On Mac, press Command + Shift + 3.
Tips on taking a screenshot of screen part
- Choose a file type. The screenshot can be saved as a PNG or JPG file. Select one depending on your needs.
- Edit as needed. After taking your screenshot, you can use a photo editor to make further adjustments as needed.
- Delay capture. Some tools allow you to set a delay before capturing the screenshot. This is useful for capturing pop-up menus that disappear quickly.
- Keep screenshots organized. Save screenshots in designated folders and name them properly so it's easy to find them later on.
- Compress images. If your screenshot folder is too large, resize the images in it to reduce their size.
- Manage memory usage. If you're utilizing a third-party app for taking a screenshot, make sure it's not taking up too much memory. This can slow down your device's performance.
Conclusion
In conclusion, knowing how to take a screenshot of a selected area is a fundamental skill for both Windows and Mac users. It enables you to focus on specific content and share it effectively.
Whether you're highlighting critical information, documenting technical issues, or creating educational materials, the ability to take precise partial screenshots empowers you to communicate with clarity.
So, the next time you need to grab a specific portion of your screen, you'll be well-equipped to do so with confidence and ease. It's really as simple as that!
Co-authors


