How to Record a Video on Windows 10
Do you often need to record your screen while demonstrating different programs? Don't look any further; we'll show you how to easily record a video on Windows 10 and how to use any app.
This can be helpful for making video lessons, presentations, or just saving important things that happen on your computer. But a lot of people have trouble figuring out how to capture specific software and what tools to choose for it.
We will look at 6 different video recorders in this article. These include built-in options and applications from other companies. We will also give you tips and step-by-step instructions to ensuring the whole session goes smoothly.
Windows 10 screen recorders: summary table
| Program | Ease of use | Key features | Link |
|---|---|---|---|
| Icecream Screen Recorder |
Novice-friendly
|
- Multiple recording modes
- Built-in editor - Annotation tools - Scheduled recording - Multiple output formats - Easy sharing - Customizable hotkeys - Screenshot capability |
|
| OBS Studio |
Requires steep learning curve
|
- High-performance streaming
- Customizable scenes - Source management - Live streaming integration - Plugins and extensions - Modular docking system - Audio controls |
|
| Game Bar |
Novice-friendly
|
- Live streaming
- Screenshot capture - Performance monitoring - Customizable overlay - Game capture widget - Keyboard shortcuts - Integrated Xbox app |
|
| Bandicam |
Novice-friendly
|
- Overlay features
- Screenshot capture - Hardware acceleration - Multiple recording modes - Resolution, frame rate, and bitrate adjustment |
|
| ShareX |
Good for beginners and professionals
|
- Screenshot capture
- Custom workflows - Screen recording and GIF creation - Annotation tools - Multiple export options |
|
| ScreenRec |
Allows even beginners to start recording with minimal configuration
|
- Webcam overlays
- Cloud sharing capability - Offers encrypted links |

How we picked tools to record a video on Windows 10
The criteria we used to ensure optimal performance and satisfaction include:
- Compatibility. The video recorders are fully compatible with Windows 10, offering a seamless experience without any issues.
- Ease of use. We prioritized simple interfaces and intuitive controls to enhance accessibility for all people, including beginners.
- Performance impact. The video recording software has minimal influence on system performance, for smooth sessions without lags or slowdowns.
Option 1: Icecream Screen Recorder
Recording Windows applications can be a great way to create demos. With Icecream Screen Recorder, you can easily capture any program on your computer and save it as a file. This program provides a clean interface and advanced features.
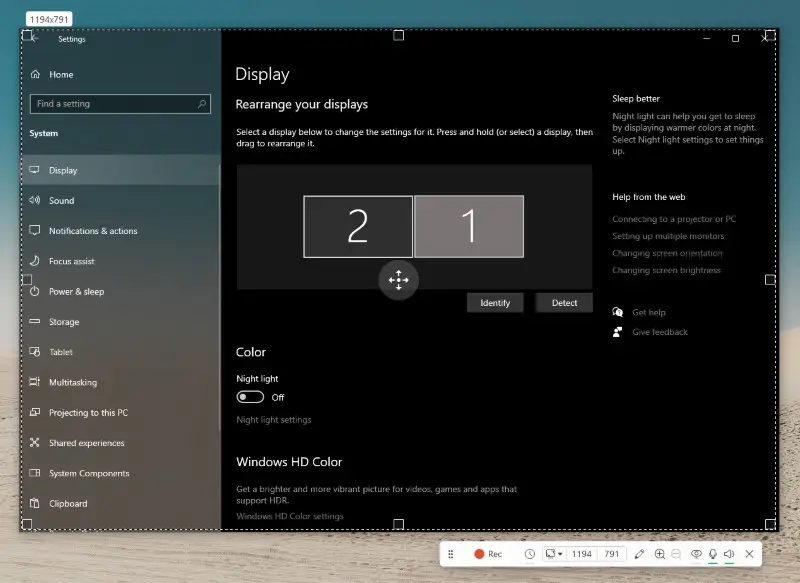
How to screen record a Windows application with Icecream Screen Recorder
- Download and install the free screen recorder for Windows computers.
- Launch the software and select "Capture video" from the side menu.
- Click the "Custom area" button and move your cursor over the desired app.
- Adjust the selected area by dragging the edges if necessary, and hit "Rec" to start.
- Use the toolbar at the bottom of the screen to pause or resume.
- Once you are done, press the "Stop" button and choose what to do with the result.
Pros:
- Versatility. You can get various types of content, including gameplay, webinars, and more.
- Additional options. Users can capture the entire screen, specific windows, or custom areas, providing flexibility in choices.
- Annotation tools. It includes built-in annotation, facilitating on-the-fly highlighting, drawing, and adding text.
- Timer. You can schedule screen recordings in advance, automating the process for planned events.
- Zoom in/out. You can zoom in and out, ensuring a more detailed focus on specific areas of the desktop.
- Hotkeys. The screen recorder has hotkeys for start, pause, stop, and other functions. You can see the full list of keyboard shortcuts in the settings menu.
Ultimately, utilizing Icecream Screen Recorder proves to be the most advantageous method for recording Windows applications. With its interface and various customization options, it provides a hassle-free experience for all your needs.
Option 2: OBS Studio
Utilizing OBS Studio to record a screen video on Windows 10 provides a seamless and efficient method for achieving top-notch results. It is widely used by content creators, gamers, and professionals to capture and broadcast their desktops or live events.
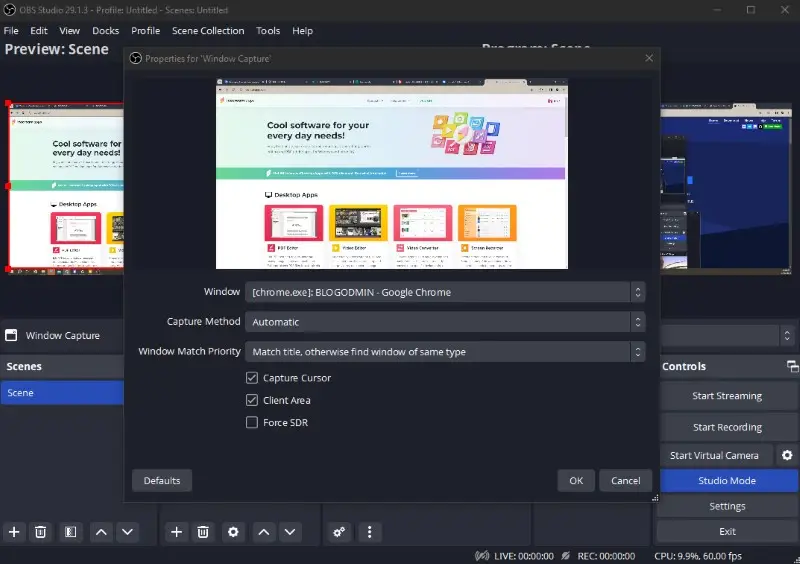
How to record your screen with OBS Studio
- Download and install OBS Studio on your computer.
- Open it and click the "+" icon under the "Sources" section.
- Select "Window Capture" from the drop-down menu.
- Pick the desired window or program and hit "OK".
- Press "Start Recording" at the bottom right corner of the interface.
- Once you are done, click the "Stop Recording" button.
Pros:
- Customizable settings. You can adjust various parameters such as resolution, frame rate, audio sources, and more to ensure high-quality footage.
- Real-time editing. The video recorder allows you to make on-the-fly changes, such as adding text, images, or webcam footage.
- Multiple sources. You can choose several windows or applications simultaneously by importing them as separate sources.
- Open-source. This is a completely free screen recorder with no watermarks or limitations, so it is accessible to everyone.
Cons:
- Steep learning curve. For beginners, it may take some time to get familiar with all the features and settings.
- Resource-intensive. A scene with multiple sources, overlays, and complex elements can increase the CPU and GPU load and slow down your computer.
- Restricted editing. While the ability of real-time basic changes exists, it should be noted that it is not fully equipped video editing software.
Using OBS Studio to record screen video on your PC is the top choice for numerous individuals due to its advanced capabilities and customizable options. With a little practice, you can produce professional-looking footage that will enhance your content and captivate your audience.
Option 3: Built-in Windows 10 screen recorder
While there are many options available, the pre-installed Game Bar offers an effective way to capture your applications.
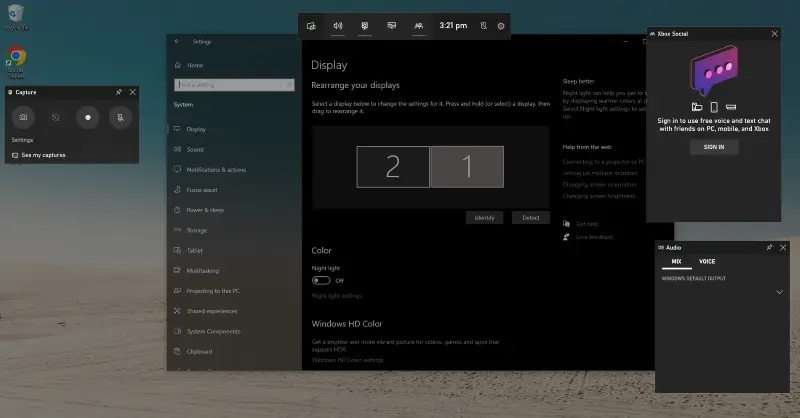
How to employ Game Bar for recording Windows apps
- Launch the target program.
- Hit Windows key + G on your keyboard to open the tool.
- Initiate the process by clicking the "Record" button or pressing Windows key + Alt + R.
- A timer will appear in the top right corner of your screen to indicate that it has started.
- To end the session, hit "Stop" or press Windows key + Alt + R again.
- The result will be automatically saved in the "Captures" folder in your videos directory.
Pros:
- Easy accessibility. Activation by a simple keyboard shortcut makes it accessible during gameplay or application usage.
- Built-in tool. The free screen recorder comes pre-installed on Windows 10, providing a readily available solution.
- System performance. The program has a minimal impact on system work, allowing for smooth process without significant lag.
Cons:
- Game focus. It is primarily designed for gaming, which may result in limited features for other applications.
- Storage control. You can't choose where files are stored. They are automatically saved in the default folder.
In summary, utilizing Game Bar for capturing Windows programs is an effective approach that does not necessitate any extra downloads or configuration. It may not have the extensive capabilities of specialized apps, but it efficiently completes tasks without impacting performance.
Option 4: Bandicam
Bandicam is a screen recording software that's popular for its ability to get high-quality visuals and audio from your computer desktop. It’s commonly used for gameplay, tutorials, and other types of content.
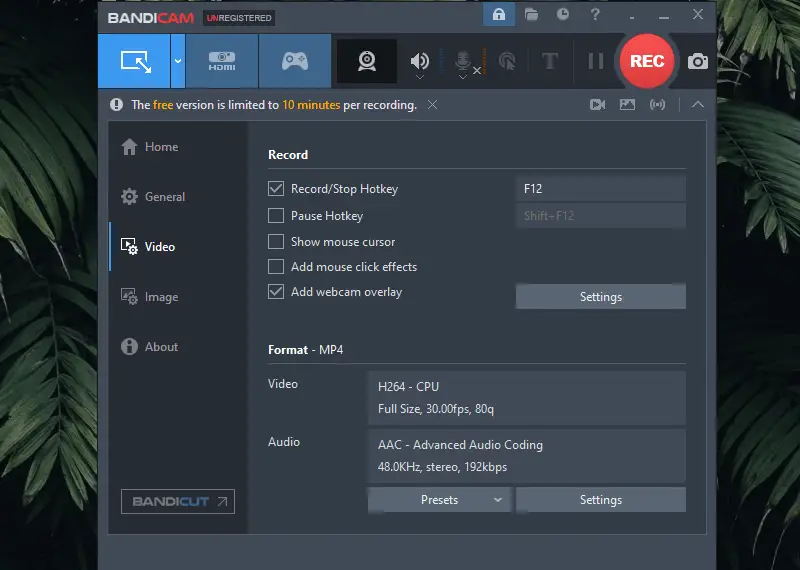
How to record a screen video with Bandicam
- Get the app from the official website and install it on your PC.
- Launch the free screen recorder and choose the part of your display you want.
- Access the settings by clicking the gear icon.
- Hit the red circle to begin capturing.
- Press the square button to finish the session.
Pros:
- High quality. Captures video in definition up to 4K UHD.
- Efficient compression. Utilizes a proprietary codec to compress content without substantial loss in clarity.
Cons:
- Reduced FPS. May cause a significant drop in frame rate on lower-end PCs or laptops.
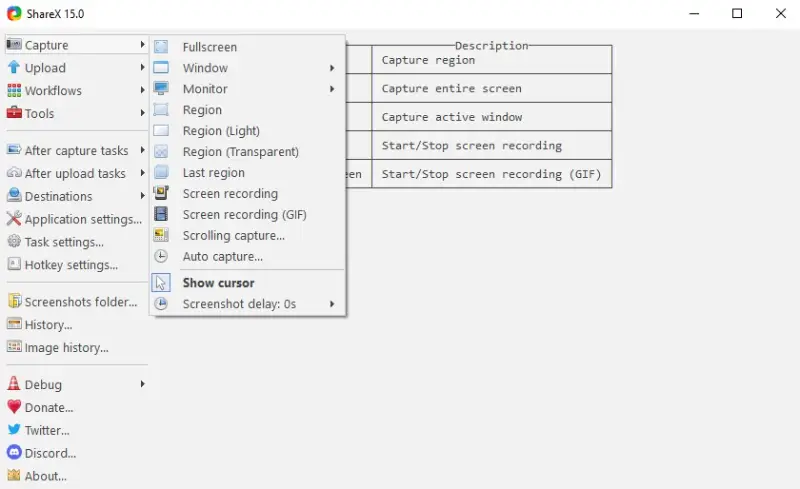
Option 5: ShareX
Utilizing ShareX to record a screen video on Windows 10 offers a flexible and lightweight solution. It's a popular choice among professionals, educators, and casual users who need a free and versatile tool.
How to capture your screen with ShareX
- Download and install ShareX on your computer.
- Launch the application and click the "Task Settings" icon on the main interface.
- Navigate to "Screen Recorder" under the "Capture" section and configure the desired settings.
- Return to the main menu and select "Capture > Screen Recording" or hit the default hotkey.
- Choose the area you wish to preserve by dragging to define a region.
- Press "Stop Recording" when you're finished, and the clip will automatically save.
Pros:
- Completely open-source. The program is entirely free without watermarks or limitations, making it accessible for all users.
- Extensive customization. You can adjust settings, choose different codecs, and personalize workflows for an optimized experience.
- Broad functionality. Beyond screen recording, the app also offers GIF creation and file-sharing.
- Lightweight application. It has minimal impact on system resources, so it is suitable for most devices.
Cons:
- Requires configuration. Initial setup can be confusing for the first time.
- External codec installation. To unlock full capabilities, you may need to install additional codecs like FFmpeg.
Using ShareX to record your screen is an excellent option for those seeking a free tool. While it may take some time to explore all its features, the software’s adaptability and performance make it a standout choice for both simple and complex tasks.
Option 6. ScreenRec
Utilizing ShareX to get a visual and audio of your screen on Windows 10 is a flexible and light tool. Many professionals, teachers, and casual users who need something free choose this one.
How to employ ScreenRec as a video recorder
- Visit the official website and download the installer for Windows.
- Run the file and follow the on-screen instructions to set up the software.
- Open the program. To record your screen, click on a red circle in the toolbar.
- Press on the microphone and webcam icons to toggle these options on or off.
- Once you've set up the preferences, utilize the red button to begin the process.
- To finish the capturing, hit square.

Pros:
- Cloud Sharing. Automatically generates a private link for your videos, allowing you to send them quickly.
- Lightweight. Designed to require minimal system resources, which means it won't slow down your computer.
Cons:
- Recording Limitation. If you are using ScreenRec without signing up for an account, you can only make up to 5 minutes.
Best formats for video capture
The MP4 extension is generally the best choice. It is a digital multimedia container format common for storing video and audio data.
Why MP4 is the best format:
- It is compatible with most devices, operating systems, and media players, making it highly versatile for sharing and playback.
- Maintains high quality, suitable for most needs, including streaming and uploading to various platforms.
- Utilizes the H.264 codec for compression, which provides a good balance between clarity and size.
- Most recording software and editors default to MP4 due to its broad support and ease of use.
Other formats
AVI (Audio Video Interleave)
- Advantages: Provides high quality with minimal compression, so it is suitable for professional needs where it is paramount.
- Disadvantages: Results in larger files, which can be cumbersome for storage and sharing.
MOV (QuickTime Movie)
- Advantages: Supports high-quality video and audio, and is well-suited for editing in professional software, especially on Apple devices.
- Disadvantages: Big sizes and can be less compatible with non-Apple devices and platforms.
MKV (Matroska Video)
- Advantages: Has a wide range of codecs and can include multiple tracks and subtitles, providing flexibility and high quality.
- Disadvantages: May require specific media players or codecs for playback, and increased file sizes may be an issue for some people.
WMV (Windows Media Video)
- Advantages: Provides good compression and is appropriate for Windows.
- Disadvantages: Poorer compliance with non-Windows devices and platforms, and sometimes lower quality compared to MP4.
- Advantages: Optimized for web and open source, ready for online platforms and website embedding.
- Disadvantages: Less widely supported outside of web contexts, and not as commonly used for general needs.
Overall, MP4 is a highly versatile and widely adopted format that balances quality, compatibility, and file size, making it ideal for a broad range of applications from casual to professional media production.
Tips on how to record a video on Windows 10
- Check system requirements. Ensure your computer meets the system needs of the chosen software to avoid performance issues.
- Configure recording settings. Adjust parameters such as frame rate, resolution, and audio sources based on your preferences and the requirements.
- Frame the area. Select the area precisely around the application window to cut unnecessary elements and focus on the content.
- Test settings. Before your actual session, conduct a short test so the chosen parameters produce the desired quality and capture both video and audio correctly.
- Use keyboard shortcuts. Familiarize yourself with the keyboard shortcuts of your screen recorder for easy control, such as starting, pausing, or stopping.
- Check audio levels. Ensure that the sound is balanced and clear. Change the microphone and system audio settings to achieve optimal sound quality.
- Remove distractions. Close unnecessary applications and notifications to minimize distractions.
- Monitor storage space. See your available space on your device, especially for longer sessions, to avoid interruptions due to insufficient storage.
FAQ
- What settings should I consider before recording?
- Set frame rate, resolution, and audio level based on your requirements and preferences.
- What should I do if my software has performance issues?
- Check if your hardware meets the requirements of the screen recorder and adjust everything accordingly.
- Can I capture multiple monitors?
- Yes, many tools support a video from multiple monitors.
- Is there a time limit when I record a screen video on Windows 10?
- Third-party software offers more flexibility than built-in options. However, shorter segments can be helpful for easier management and editing.
- What will happen if I run out of storage space?
- Depending on the software, the session may stop automatically. If it continues despite low storage, the file may become corrupted, making it difficult to play or edit. The inability to save the data properly may also lead to a loss of the entire clip.
Conclusion
You did a great job! You can now record a video on Windows 10 while using any app. Ensure to pick a high-quality format and change the settings to fit your requirements. Don't forget to think about the audio options as well for a full experience.
You can easily and confidently capture anything by following the steps in this article. In today's digital world, being able to record your screen is a great skill to have, whether you need it for work or play.
So go ahead and start practicing. Try out different tools and methods, and before you know it, you'll be an expert.
Co-authors


