How to Convert Video Files to iTunes
Discover the key steps to convert your video to iTunes for seamless integration. Whether you're a Mac enthusiast or want to enjoy your media on iOS devices, this guide will navigate you through the process.
Apple's iTunes supports a relatively small number of file formats, limiting its user's ability to play content conveniently. Hence, the need to convert a video to iTunes arises.
To help you complete the task, we will provide step-by-step instructions on using a free video converter that can handle a wide array of multimedia formats. Try this tutorial to familiarize yourself with the program and successfully convert videos to iTunes for posterior transferring.
View your favorite movies and shows across all your Apple devices with ease. Dive into our expert tips and make converting video to iTunes a breeze.

Formats supported by iTunes
For video common formats include MP4, MOV, and M4V, with H.264 and HEVC (H.265) codecs preferred for optimal quality and compression.
Audio like MP3, AAC, AIFF, WAV, and Apple Lossless (ALAC) are also compatible with iTunes.
iTunes converter's supported formats
Comparatively, the video format converter can process MP4, MOV, AVI, WebM, MKV, MPEG, FLV, M4V, MTS, 3GP, and more.
In addition, the software can manipulate audio like MP3, M4A, and AIFF, and WAV .
Choosing the right video format
Selecting the best format depends largely on the user's needs.
- If you want to maintain video quality, MOV might be the best format.
- If your goal is to save storage space, the MP4 format would be a better choice.
Regardless of the chosen format, Icecream Video Converter simplifies the process and helps make all the entries compatible with the iTunes application.
How to convert a video to iTunes
Saving media in an Apple-friendly format is simple with Icecream Video Converter. Simply follow the instructions below.
1. Install the best video converter
Download file converter for PC and run the installation folder. The Wizard will aid you with the process that takes less than a minute.
Once ready, launch the program.

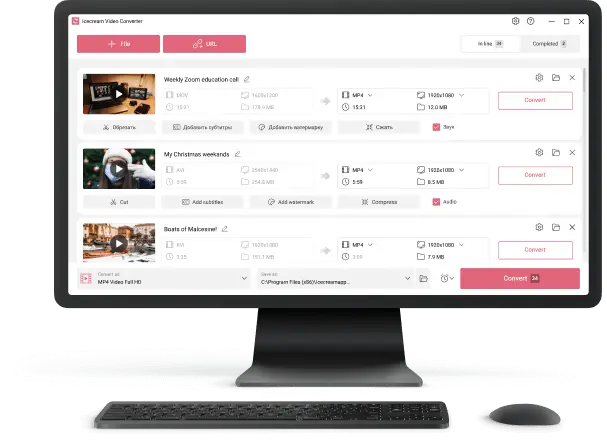
2. Import packages
Use the "Add file" button to select the videos from your computer or simply drag and drop all the media into the converter.
If you have multimedia of various types, you can process all archives in bulk.


3. Configure the output settings
- Select the output format. Since you already know which formats are supported, select the preferred one in the "Convert to" menu.
- Use template. There is no iTunes option in the preset list, but there is a record of supported Apple devices like iPhone, iPad, etc. Choose your device to make files compatible with it.
- Set the output quality. If you need the video to be of a particular resolution and quality, you can simply change the conversion settings using the corresponding menus.
- Trim the clip. You can also adjust the duration of the record via the "Trim" tool.
Pay attention to the fact that when choosing the preset, the quality to be converted would automatically be selected as "High" to achieve the perfect balance between the size and video fidelity.


4. Start the video to iTunes conversion
Press the "Convert" button on the right of the added file to begin processing.
For bulk video conversion, use the button located in the bottom right of the software's interface.
When files are ready, click the folder icon to view them. You can also access all the videos in the "History" tab.


5. Transfer files into iTunes
Now, open the iTunes app and go to the "File" menu. Hit "Import..." and add all the converted videos to your library. They will be saved in the "Music Videos" folder.


FAQ
- Can I convert videos from YouTube for iTunes?
- Yes, you can, just make sure you’re saving them in a format iTunes recognizes — like MP4 or M4V. If you’re unsure how to do this, here’s a helpful guide.
- What is DRM protection in videos?
- DRM, or Digital Rights Management, is basically a way for companies to control how their clips are used. If you’ve ever tried to copy or share a movie from iTunes and hit a wall, DRM is probably why.
- How do I ensure a converted video is available on my iPhone or iPad?
- Once you’ve turned your footage, add it to your iTunes or Finder library. From there, just sync it to your device. It’s a pretty straightforward process, but don’t forget the sync step — it trips people up all the time.
- Can I transfer a video in a non-Apple format to iTunes?
- AVI or MKV need to be converted to an Apple-supported format, such as MP4 or MOV. iTunes primarily supports video files encoded in H.264 or HEVC with AAC audio.
- What are the best settings for converting videos for iTunes?
- A bitrate between 1500 and 3000 kbps usually works best. Also, sticking with a 1920x1080p resolution tends to look great on most screens. No need to go higher unless you’re after something truly massive.
How to convert a video to iTunes: conclusion
In conclusion, whether you're switching devices, trying to optimize storage, or simply want to play your favorite songs or clips on iTunes, Icecream Video Converter is your trusted ally. With a wide range of supported formats and additional tools, this software will undoubtedly streamline your digital media management.

Expert Tech Writer
Co-authors

Editor-in-Chief at Icecream Apps
